The Windbow Page
As you might know, we are regularly visiting the Fanø International Kitemakers Meeting in June in Danmark. I had seen a windbow several times before in magazines and I knew that George Peters had published a plan of it in Kitelines. But it was only until we met with Charmayne and Bob at Fanø 1996 when I saw a windbow for the first time in real. And it was overwhelming. On a rather windy day, Bob and Sam unpacked it and all of a sudden, this large windbow flew in the air. It had been a joint effort at the last ('96?) Fort Worden Kitemakers conference. Each of the participants who delivered one panel was awarded a pin of this project. This windbow caused a lot of attraction on the beach, but unfortunately because of the strong wind, the windbow was destroyed in the middle.
Back at home, I said to myself: "This is really a great kite, but it's too much effort for just one person". Well I had already said this when I started to build the superfly, so sometime in November '96 I decided that I would make my own windbow until next years Fanø meeting.
I digged out the article of George Peters in Kitelines, and through a quick glance, there did not seem to be any difficulties. It appeared to be just "cut and sew". Time passed by and finally in March I was sitting down to complete the windbow. However I discovered that there were indeed some parts of the plan which were not that obvious. But instead of directly starting to tackle these difficulties I worked only part time on it; in the other part of my leisure time I was trying to finish a ferry, the seabird, the parachutes, etc. also for Fanø.
Through some discussions on rec.kites and exchange of personal email, I finally discovered all the hidden secrets of the plan (see "Construction Tips").
 Happy sewing in the living room of our summer appartment... |
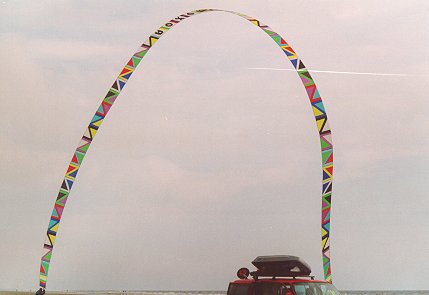
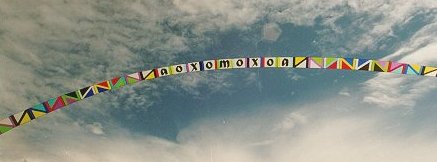
When leaving for Fanø, the windbow was of course not yet finished (like Mr. Bridle, aka Andrew had foreseen). In a joint effort with Myriam, Petra, Patrick and Sven (who were our part time guests at Fanø:) I finished the windbow on the rainy Saturday morning and afternoon. It is now 51 panels (40 normal George-Peters-pattern, 9 special character panels and one additional at each end), 70cm wide and about 45m long. Right afterwards rain was stopping and we had about 2-3 Bft wind and a very emtpy beach. This was when we decided to let the windbow have its maiden flight. Having the experience from last year in mind (with the Fort Worden Kitemakers windbow) I was a bit sceptical whether the wind would be sufficient (the windbow with all the reinforcements is now rather heavy). |
| I remembered how last year the windbow was started and thought it was a good idea to give one end to Patrick and then let the other panels out "one by one". Well, this would have normally worked but not with this windbow. At the end I was laying on the stack of panels trying to avoid that they were all pushed away at once. We somehow managed to get them all into the air (it was flying nearly overhead right from the beginning) and pulling like hell. Although Patrick and I had the assisstance of Myriam and Anja, we could hardly keep the ends in our hands. | 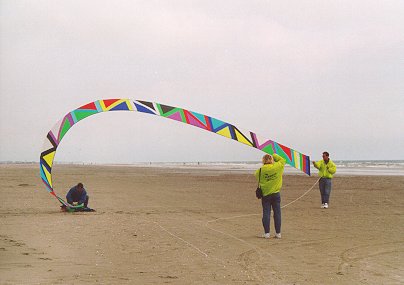 The windbow gets started... |
The damage to the windbow was very little and overnight work put everything back in place. On the next bright day, I considered wind to be too strong and had some other kites fly. On the beach I discovered someone else with a smaller variant of the windbow. I walked over and chatted with the owner. He had seen last year at Fanø "some Americans" with a large windbow... (Sam and Bob with the Fort-Worden-windbow!) and had built his windbow according to the plans of George Peters. He gave me some valuable advise about starting and landing the windbow:
- Starting Roll out the windbow completely in the direction of the wind. When the two ends are manned, lift the end of the windbow that is away from the wind and walk (or run) a quarter circle until the windbow is perpendicular to the wind. Recommendation: Don't fix the windbow or if at all, just one end. If something goes wrong, just release one end of the windbow. It will fly smoothly into the direction of the wind and slowly sink down. - Finishing or landing Make sure that noone is near to the windbow then just let one end of the windbow go. It will fly smoothly into the direction of the wind and then sink down. When it is down collect the windbow because the wind will try to turn it and this could cause damage.Using this advice, it was very easy on two subsequent days to fly the windbow (on Sunday afternoon for just ten minutes - then we could not longer hold it - and on Monday morning for more than one hour at a constant wind of about 2 Bft).
I have attached a thick ring to the end of the windbow. I can now attach - either a line to each side to let the windbow raise into the air and attach it somewhere to the ground and/or - a wooden bar to fly the windbow directly from the hands and enjoy the struggle with the windforces.
Unfortunately I had another break in the windbow. The place where I had attached the thick ring to the final panel broke on one end. As the windbow was under strong suspension, the broken end and the ring bounced back and broke the light of my car... The lesson I learned from this is that I reinforced this part even stronger. I also changed the way I had attached the flying line. Initially I had attached the line at just one point (at 1/5th from the leeding edge). Now I have attached three lines (at the leadind edge, 1/5th and 2/5th of the leading edge) which are then joint at a ring at 1/5th of the leading edge. Since have done this I did not have any more break.
| Back to the built-page. |  |